Wondering what is the optimal hanging distance for LED grow lights to support fast plant growth and higher harvest yields? Here you can view accurate full-power PPFD test data of the Sunritek JF 840W LED grow light at 4 different mounting heights, covering seedling, clone, vegetative and flowering growing stages.
Across global commercial greenhouses and indoor cultivation farms, LED grow lights have become the mainstream lighting choice for new projects worldwide. Legacy HID fixtures are only retained as old stock in older grow spaces undergoing gradual upgrades, and few newly built facilities opt for HID today.
Our high-power Sunritek JF 840W LED grow light outputs steady, even PPFD with minimal heat emission. Equipped with 0–10V dimming, growers adjust hanging height and brightness together to fit unique light needs of various crops and growth phases, accelerating plant development and improving harvest quality with gentle balanced illumination.
Quick PAR & PPFD Basics
- PAR (400–700nm): The spectrum range plants rely on for photosynthesis.
- PPFD (μmol/m²/s): The measurable density of usable photons reaching plant canopies.
Excessively high PPFD scorches leaf tips and triggers discoloration; insufficient light leads to elongated stems and low yields. The JF 840W delivers uniform light coverage over its full growing area via flexible mounting height tuning.
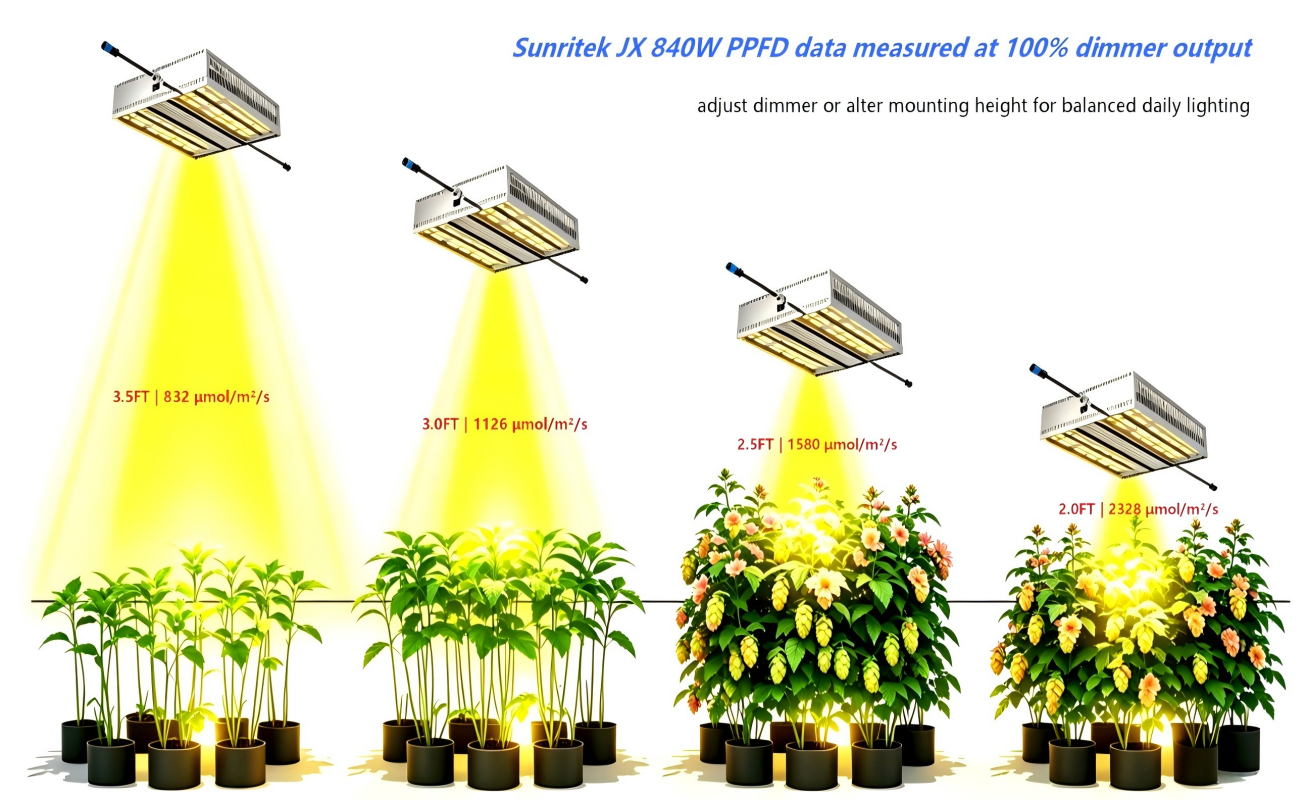
Recommended Hanging Heights for Sunritek JF 840W
Use the ranges below as a starting reference; fine-tune height and dimmer output to match your crop’s light tolerance.
Seedlings
24–36 inches above soil
Higher hanging positions create soft, evenly distributed light to stop delicate sprouts from drying out. Avoid lowering the fixture during early growth.
Pro tip: Keep the light at the 36in maximum height with a low dim setting for new seedlings. Slowly increase dimmer output as roots fully establish over 2–3 weeks.
Clones
12–18 inches above cuttings
Mid-range height delivers mild, balanced PPFD that suppresses stretch and accelerates root formation for higher clone survival.
Pro tip: Start rooting cuttings at low dim power within this height bracket. If cuttings wilt persistently after dimming down, raise the fixture height marginally to reduce photon load.
Vegetative Stage
12–24 inches above canopy
Lower mounting heights produce higher peak PPFD, while higher positions expand uniform light coverage across wider canopy areas. Both modes suit commercial high-light crops.
Pro tip: Visible stretched internodes mean insufficient light. Ramp up dimmer output first; only lower the fixture if max dim power still fails to hit your target PPFD.
Flower / Fruit Stage
18–24 inches above canopy
This height range delivers enough PPFD for blooming and terpene accumulation. Full-power test data proves the fixture outputs very strong light intensity, so it is recommended to keep the light at a higher position within this range. Passive cooling reduces canopy heat and leaf burn risk.
Pro tip: If you run the dimmer at full output, use the upper half of this height range. For regular growing environments, raise the fixture or lower dim power to avoid light stress.
Practical Grow Tip
- Lower the JF 840W → higher canopy PPFD, smaller coverage footprint
- Raise the fixture → softer light, wider growing coverage
With 2352μmol/s PPF & 2.8μmol/J efficiency, it beats old 1000W HID/HPS for higher yields and lower energy bills. Adjust brightness together with hanging height to hit ideal PPFD for seedlings, veg and bloom without burning or leggy growth; daisy-chain up to 4 units for simple mass setup.
Wrap-Up
Tune your Sunritek JF 840W hanging distance to match each growth stage to maximize light efficiency, cut energy waste, and boost overall crop quality and yields.
Want to learn more about the full specs, Sunritek JF 840W commercial grow light?
Click here to view the product page >>
